> ## Documentation Index
> Fetch the complete documentation index at: https://docs.noclick.com/llms.txt
> Use this file to discover all available pages before exploring further.
# Bring your own OAuth app
> Connect supported providers through your own OAuth client ID and secret instead of NoClick's app.
By default, OAuth connections go through NoClick's registered apps, so connecting is one click. On a few providers you can use your own OAuth app instead: the consent screen shows your app's name, and API access runs under your developer account's rate limits and tier.
## Supported providers
| Provider | Register your app at |
| ------------- | --------------------------------------------------------------------- |
| X (Twitter) | [developer.x.com](https://developer.x.com/en/portal/dashboard) |
| Shopify | [partners.shopify.com](https://partners.shopify.com) |
| WordPress.com | [developer.wordpress.com/apps](https://developer.wordpress.com/apps/) |
## Connect with your own app
On the node, open the **Credentials** tab and find the OAuth connect section for the provider.
Click **Use custom OAuth app credentials**. It's optional and collapsed by default.
Paste both values from your provider's developer console, then click **Connect \[Provider] Account**. The consent flow now runs against your app.
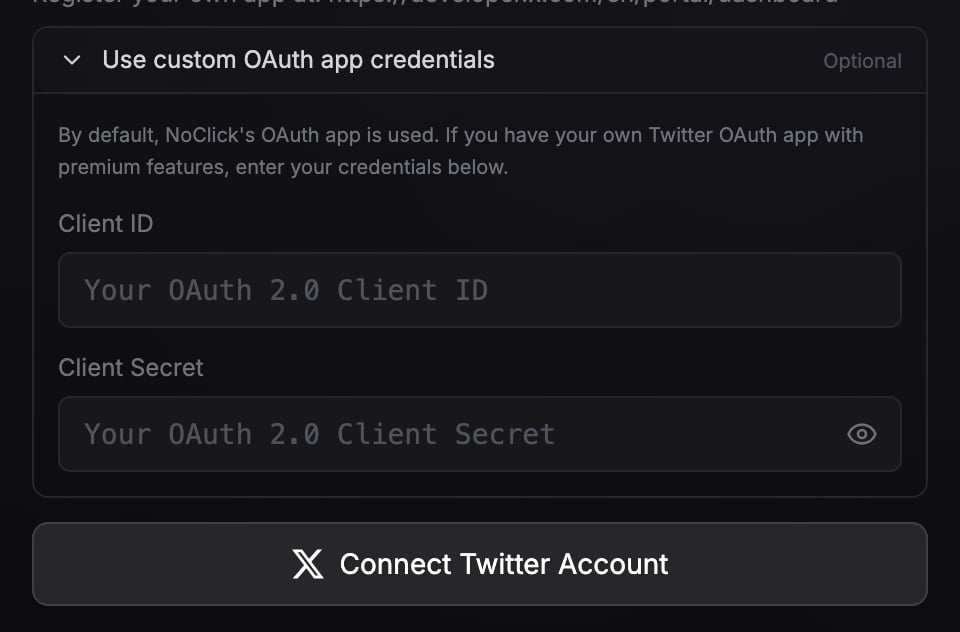 Your client secret is stored in the same [encrypted credential blob](/credentials/security) as the tokens, and automatic token refreshes use your app from then on.
For Shopify, add `https://noclick.com/api/auth/shopify/callback` as a redirect URI in your Shopify app settings before connecting. The form shows this reminder inline.
## When you'd want this
* **Your own rate limits and tier.** API quotas attach to the OAuth app. With your own app you're not sharing NoClick's pooled limits, and on X, operations that require a paid API tier run at whatever tier your developer account has.
* **Your own billing on X.** X API calls made through your own app are billed by X to your developer account directly, so NoClick doesn't charge its per-resource X API credits for those runs. See [What costs credits](/billing/costs).
* **Your own branding.** Users approving the connection see your app's name and logo on the consent screen.
## Next steps
The standard OAuth and API-key flows.
Encryption, refresh, and who can see what.
Your client secret is stored in the same [encrypted credential blob](/credentials/security) as the tokens, and automatic token refreshes use your app from then on.
For Shopify, add `https://noclick.com/api/auth/shopify/callback` as a redirect URI in your Shopify app settings before connecting. The form shows this reminder inline.
## When you'd want this
* **Your own rate limits and tier.** API quotas attach to the OAuth app. With your own app you're not sharing NoClick's pooled limits, and on X, operations that require a paid API tier run at whatever tier your developer account has.
* **Your own billing on X.** X API calls made through your own app are billed by X to your developer account directly, so NoClick doesn't charge its per-resource X API credits for those runs. See [What costs credits](/billing/costs).
* **Your own branding.** Users approving the connection see your app's name and logo on the consent screen.
## Next steps
The standard OAuth and API-key flows.
Encryption, refresh, and who can see what.